How to Format Images with Embedded Text in MS Word
If you often receive translation documents that contain images with embedded, noneditable captions, which your clients expect to be translated, here is how you could use your favorite CAT tool to translate such files in three different ways:
Option No. 1: 1-to-1 Formatting of Captions
This is the most popular option. Remove any images with noneditable captions from your working file, delete the embedded text you need to translate, and then reinsert the images into your file. Click inside the document and drag to create a text box of the desired size. Continue drawing and inserting as many text boxes as needed to cover all the caption areas.
To configure the text boxes:
- Click inside a text box and right-click to select the Format Shape option. On the left-side column, select the Text Options menu. Hover over the tab icons and click the Layout & Properties tab. In the Text Box menu area, make sure to check the Resize Shape to Fit Text check box. This way, the text box will automatically adjust to fit the translated caption.
- For expedient formatting, you can group all the text boxes together and move them as a single object. To do that, click the Group command from the Picture Format tab. Hold the Shift (or Ctrl) key and click the objects you want to group. The text boxes will be grouped together as one object so that they remain locked after translation.

The resulting images will be the duplicates of the originals—but with the editable captions, which you will be able to translate using your CAT tool.
The translated files may not need any additional formatting, since the text boxes will automatically adjust to the final word count. However, you might need to be more careful if the captions in your working files are positioned too closely to each other. The text boxes may eventually overflow or overlap with each other. If that happens, you can decrease the text font. In addition to the translation and formatting services, we also offer document finalization and signing-off services for your convenience.
Option No. 2: Bilingual Table
The Pros: It is the simplest and the fastest option.
The Cons: The format of the target document will not be the same as the original layout.
How does it work?
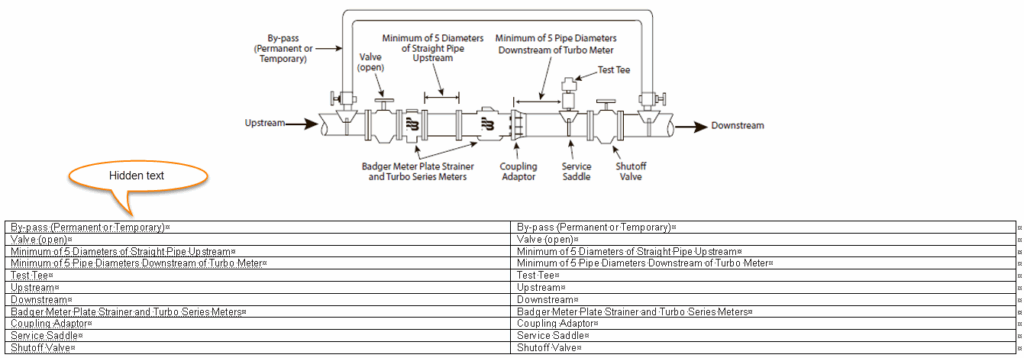
Instead of manipulating the original images, leave them as they are. Then, next to the images, create and place a corresponding bilingual table with the translated captions.
This bilingual table should consist of two columns: In the left column, place all the text embedded in the images. Then copy-paste the content of the left column into the right column. Finally, make sure to hide the source text in the left column using the MS Word Hidden option.
Here is how it should look like:

This way, you will be able to have the text in the right column translated by your CAT tool without making any changes in the left column.
Continue translating the document and, finally, generate the target translation. Don’t forget to unhide the previously hidden text!
So, now, your final document will magically display the two-column table with both the source and target texts!

Option No. 3: Bilingual Table + Post-Translation DTP
Select this option if your client wishes to receive the target document that perfectly reproduces the original formatting, which happens to be very complex and can only be reproduced using Illustrator or Photoshop. Such documents include engineering drawings, wiring diagrams, etc.
This option involves two steps:
- Create a two-column bilingual table with the source text on the left side, as described above (or ask us to do a pre-DTP text extraction), and translate it.
- Send us your translated file so that we can complete its formatting using Illustrator or Photoshop.
In the end, you will be delivered the final document with the reproduced images and translated captions.
If you are still unsure, feel free to consult with your PMs or seek any other guidance regarding your formatting needs.
